LED wash wall lamp, as the name implies, let the light like water wash the wall, mainly used for building decoration lighting, and also used to outline the large buildings.Since LED has the characteristics of energy saving, high luminous efficiency, rich color and long life, the washing wall lamp of other light sources is gradually replaced by LED washing wall lamp in 2013.
Product size
Technical parameters
1. Main material:High - pressure cast aluminum, high - light ultra - white tempered glass, back flame retardant ABS;
2. Surface treatment:UV Polyester powder coating;
3. The light body color:Dark grey;
4. Safeguard procedures:Silica gel ring compacted waterproof;
5. Average lifetime:350mA20000hours,500mA15000hours;
6. Control mode:CC/DMX512;
7. Operating ambient temperature:-25℃~50℃
8. The light colored temperature: Red/Green/Yellow/Amber/Vermilion/Acid blue/3000K/4000K/5000K/6000K
9. Light distribution device:Optical lens series:8°/15°/25°/45°/10×30°/10×60°/20×40°
10. Working voltage:DC24V
11. Way to install:Single U/Double U Adjustable Angle bracket
12. Level of protection:IP65
13. Working environment humidity:10%~90%
Led Wall Washer Lamp,Led Wall Washer Light Fixtures,Led Wall Washer Flood Light ,Led Wall Washer Light Products Jiangsu chengxu Electric Group Co., Ltd , https://www.satislighting.com
The BasicsThe standard connecTIon for driving an LED from a port is shown in Figure 1. The load is typically a single LED, but can be dual LEDs in series (as shown), depending on choice of LEDs and supply voltage. The series resistor R1 is necessary to limit the current through the LED. The value of resistor R1 required to drive a current IPORT through the LED can be calculated using the formula:
R1 = (VEXT-VPORT-VLED) / IPORT Ω
where VEXT is the LED supply voltage
VLED is the voltage drop across the LED (s) at the required load current (usually in the range 1.8V to 2.4V for red LEDs, and 3V to 4.2V for blue, white, and high efficiency green LEDs)
VPORT is the voltage drop across the output port when sinking the required load current (for example 0.25V at 20mA for MAX6964) 
Figure 1. Standard LED connecTIon.
VEXT does not have to be the same voltage as the port expander V + supply pin. The protection within many (but not all!) IC's open-drain output structures allow a load to be connected to a voltage above the chip supply voltage (but not negative with respect to GND). For example, the MAX6964, MAX6965 outputs are rated at 7V, allowing the LEDs in the Figure 1 circuit to be connected to 6V instead of the 3.3V port expander supply. The higher LED supply voltage allows two red LEDs in series (or alternatively a single white LED) to be driven.
The LED current will vary with supply voltage and LED forward voltage. Resistor initial accuracy and temperature coefficient, plus any variance in port output voltage with temperature and supply voltage, will also play a part. If consistent LED current is important, make sure that the voltage drop across resistor R1 is high compared with the total voltage variances in VEXT supply and LED. For example, consider a situation where we need to drive a nominal 20mA through a red LED whose forward voltage is 2V ± 0.2V. We have a choice of either 3.3V ± 5% or 5V ± 5% for VEXT. Let us say we are using a MAX6964 port which will drop 0.25V ± 0.1V when sinking 20mA.
Using the typical values, the value for R1 calculates to be (5-2-0.2) / 0.02 = 140Ω for the 5V supply case, and (3.3-2-0.2) /0.02 = 55Ω for the 3.3V case. Using these exact values ​​for R1, then the actual current variation at the tolerance extremes would be ± 3.9mA (a 19.5% variation) for the 5V case, and ± 8.5mA (a ± 42% variation) for the 3.3V case.
Clearly the 3.3V solution has a much wider current variation than the 5V solution. However, the 5V solution dissipates more power in the current limiting resistor. If this current variation is too high, consider using a port expander with constant-current (internally current limited) outputs such as MAX6956 and MAX6957, or use techniques such as shown in Figures 7 to 9 which use an external transistor to control the current more accurately. Driving LEDs in ParallelMultiple LEDs can be driven in parallel to share the current from a single output (Figure 2). Series resistors R2 and R3 set the current through each LED. Driving LEDs in parallel as opposed to in series reduces the drive voltage headroom required, but also reduces the maximum drive current available for each LED. 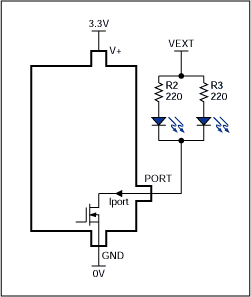
Figure 2. Driving multiple LEDs from one output. Want More LED Current? Use More PortsIf more load current is required than is available from one port, multiple ports can be paralleled in a wire-OR fashion to drive a single load. Because the outputs are open drain, multiple outputs at opposite levels won't short. However the open drain outputs are not current limited, and so they need to be prevented from carrying excessive current. A safe way of avoiding overloading is to use a separate current limiting resistor per port (Figure 3). When both outputs are low, the resistors R2 and R3 set the LED current to a safe level for each output. If the two ports are switched to opposite levels, half the current will flow, so this scheme provides some current intensity control too (off-1/2 current-full current). 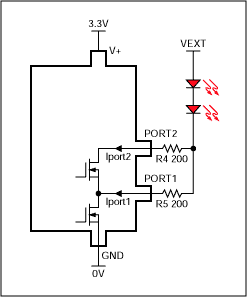
Figure 3. Paralleling otputs-the safe way.
An alternative approach is to guarantee that the paralleled ports are switched together. Many port expanders (MAX6964, MAX6965, MAX7313, MAX7314, MAX7315 and MAX7316 included) use a register structure that allows multiple outputs to be switched simultaneously with the same software command. If this is the case, it becomes a software issue to ensure that the ports will always be set to the same level, and the circuit of Figure 4 can be used. Remember that programming the ports to opposite logic levels will mean that one output will sink the full current expected to be shared between the outputs ... 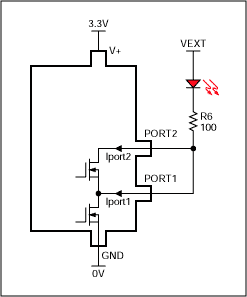
Figure 4. Paralleling outputs-the lower cost way. Even More LED Drive Voltage or Current? Add a TransistorAs discussed earlier, output loads must not be connected to a voltage outside the port expander's rated range. This becomes a problem when driving many series LEDs or if a high current is needed. The circuits shown in Figures 5 to 9 use an external transistor to extend the voltage drive and / or the drive current.
The first circuit uses a single transistor switch which essentially replaces the port expander's output driver (Figure 5). The transistor ratings alone determine how much LED current and voltage can be handled. Advantages of this circuit compared with the circuits discussed next are low wasted voltage across Q1 because it is turned on hard, and the LED current will not vary with port expander supply voltage. Disadvantages are that LED current will vary with the VLED supply voltage, and that the circuit uses two resistors. 
Figure 5. Driving LEDs with higher current or from a higher positive voltage.
The circuit of Figure 5 allows any positive voltage to be used for VEXT. The circuit of Figure 6 allows any negative voltage to be used, and has the advantage that the LED current flows from the port expander supply to the negative supply, making the sum of the two supplies available to drive the LEDs. The optional 1MΩ resistor ensures that transistor Q2 is off when the port output is high (high impedance), and it should only be necessary at elevated temperatures when Q2 becomes relatively leaky. Note that the Figure 6 circuit doesn't draw current when the LED is off, unlike the Figure 5 circuit which always draws current through R7. 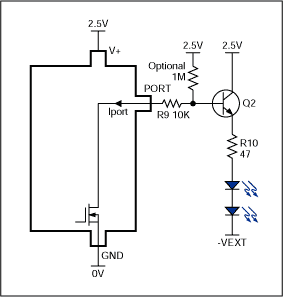
Figure 6. Driving LEDs with higher current or from a negative voltage. What about Constant Current? The LED drive current in the circuits of Figure 5 and 6 varies with LED supply voltage, VEXT. If VEXT is not well regulated, this could be a problem. In the circuit of Figure 7, Q3 operates as a common-base (cascode) current switch. The port output VPORT is constrained to a safe voltage of (V +-VBE) because Q3's base is tied to the driver supply voltage, V + . Q2's emitter current IPORT can be calculated using the formula:
IPORT = (V +-VPORT-VBE) / R11 Amps
The port current Iport (also Q3's emitter current) will flow through Q3's collector and the LED loads, less a small base current taken by Q3. The current error due to Q3's base current can be kept below 1% by choosing a reasonably high gain ( ß> 100) transistor for Q3. If supply voltage V + doesn't vary much (VPORT and VBE won't), then this circuit works as a pretty good constant current sink, dependent on the port expander supply voltage, but independent of the LED supply voltage VLED. 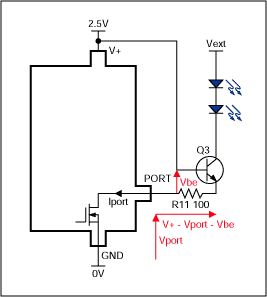
Figure 7. Active-Low, constant current sink LED drive.
One disadvantage of the Figure 7 circuit is that the LED load current flows through the port expander active low output, thereby limiting the maximum LED current to that of the port expander. The Figure 8 circuit avoids this problem, and allows the current as well as the voltage rating to be determined by the transistor ratings. Q3's emitter current ILED can be calculated using the formula:
ILED = (V +-VBE) / R11 Amps
In the Figure 8 circuit the port expander active high output is supplying Q3's base current only, which is small enough that the port output voltage drop is negligible and is ignored.
Figure 8 shows the mirror topology of Figure 7 with a PNP pass transistor replacing the NPN. Now the LEDs are referred to a negative supply instead of a higher voltage positive supply. LED current is supplied from the port expander's positive supply and returned into the negative supply. As for the Figure 6 circuit, the optional 1MΩ resistor ensures that transistor Q4 is off when the port output is high (high impedance), and it should only be necessary at elevated temperatures when Q4 becomes relatively leaky. 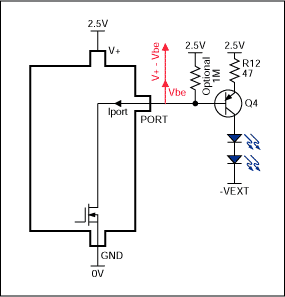
Figure 8. Active-Low, constant current source LED drive.
A limitation of the Figure 7 circuit is that the collector of the external transistor Q3 can go no lower than (V +-VBE + VCE (sat)), which is only a little below V +. If V + is high, for example 5V, then not only is the output expander dissipating a high power due to this high voltage drop forced across its output, but also the voltage headroom available for the LEDs is reduced to almost (VLED-V +). A simple solution is to bias Q3's base to a lower voltage using a series zener diode or silicon diode, depending on the voltage drop needed. Only one diode is needed to serve multiple pass transistors, as shown in the example circuit in Figure 9. With this circuit Q4 and Q5's emitter voltage sits at about 2V when the supply voltage V + is 3.3V. 
Figure 9. Using a Zener Diode to Minimize Driver Headroom.
See AlsDriving LEDs with Constant Current Port Expander Outputs
Driving LEDs with Push-Pull Port Expander Outputs


Abstract: This applicaTIon note discusses techniques for driving LEDs with the MAX6964, MAX6965, MAX7313, MAX7314, MAX7315 and MAX7316 I / O expanders (GPIOs). These techniques can be applied to other I / O expanders with open-drain outputs, as well as other ICs with open-drain logic outputs. (Types like the 74HC06 and 74HC07 can be used for high current drive applicaTIons).